使用 busybox 最新版本的镜像建立一个 pod, 并运行 sleep 命令,间隔为1小时,并为该pod配置一个环境变量,变量名为:PLANET, 值为: blue
在 kubernetes 集群中,可以使用run命令直接部署一个pod,但这样的pod是不能通过ReplicaSet进行扩展,更糟糕的是Pod不具有自愈性。生产环境不建议直接用run命令。
创建 Pod 时,可以为其下的容器设置环境变量。通过配置文件的 env 或者 envFrom 字段来设置环境变量。
通过 kubectl run –help 可以获得如下的帮助信息:
1 | Create and run a particular image in a pod. |
直接执行以下命令
1 | kubectl run envvar --image=busybox:latest --env="PLANET=blue" --command -- sleep "3600" |
注意: “–command” 一定要放在最后,否则后面的参数有可能会被当成命令的参数来处理,比如这样写: –command – sleep “3600” –env=”PLANET=blue” 的结果就是错误的
首先使用 –dry-run 选项生成一个指令文件:envvar.yml
1 | kubectl run envvar --image=busybox:latest --dry-run=client -o yaml > envvar.yml |
编辑 envvar.yml 文件, 以运行 sleep 及加入环境变量
1 | apiVersion: v1 |
然后运行
运行
1 | kubectl apply -f envvar.yml |
验证结果
1 | kubectl exec envvar -- env | grep PLANET |
将CKA 备考 - 3 - 升级一个应用 的基础上回滚到前一个版本,然后检查 nginx 镜像的tag是否是 1.16
本题主要涉及到kubernetes中对应用的回滚操作。首先需要通过 rollout 命令查看应用的发布版本,再挑选合适的版本进行回滚。
history 子命令用来查看一个应用发布的历史情况,包括版本号和发布原因。
undo 命令用来回滚到前一个或指定版本的应用。命令参数如下:
1 | Roll back to a previous rollout. |
通过执行history命令我们可以得到应用的发布历史,如本题:
1 | deployment.apps/my-dep |
应该建立 Deployment 时使用的时nginx:1.16, 中间只经过一次升级,所以只需要回滚一次即可,执行
1 | kubectl rollout undo deployment/my-dep |
系统显示
1 | deployment.apps/my-dep rolled back |
再才查看history,执行
1 | kubectl rollout history deployment/my-dep --revision=3 |
1 | deployment.apps/my-dep with revision #3 |
可以看到,当前应用已经回退到 nginx 1.16 版本的镜像。
]]>将CKA 备考 - 1 - 建立一个Deloyment并显示状态 中发布的app的 nginx 镜像版本从 1.16 升级到 1.17, 然后查看复制集
本题主要涉及到应用版本的升级,在kubernetes中可以通过几种方法对已经发布的应用进行升级。
注意观察和比较升级前、后的Pod实例名,感受升级的过程对应用可用性的影响。
对于已经发布的应用,如果原来没有建立yaml文件(通过执行 kubectl apply发布)或是不想编辑源yaml文件,可以直接使用 kubectl edit 命令进行编辑。让我们先看看该命令的细节说明, 执行:
1 | kubectl edit --help |
可以看到如下的系统信息
1 | Edit a resource from the default editor. |
可以看到该命令其实是调用系统中默认的编辑器(Linux中默认为vi)对资源的配置信息进行编辑。
在解本题之前,我们先查看以下现在my-dep的列表,执行 kubectl get pod, 得到:
1 | NAME READY STATUS RESTARTS AGE |
因为我们要升级的是 my-dep 中的Pod, 现在让我们来编辑Deployment: my-dep, 所以自己编辑my-dep, 执行
1 | kubectl edit deployment/my-dep |
打开文件后,修改 containers/image中的nginx:1.16 为 nginx:1.17, 然后保存
退出 edit 以后,执行 kubectl get pod 命令,可以看到类似如下的信息
1 | NAME READY STATUS RESTARTS AGE |
可以看到,kubernetes集群开始用新的进行建立Pod, 同时保持着旧Pod的运行。
等下载完成后,会生成全新的Pod, 如:
1 | NAME READY STATUS RESTARTS AGE |
查看 rollout 历史,可以看到
1 | REVISION CHANGE-CAUSE |
可以看到发行的版本升级了。
查看复制集
1 | kubectl get rs |
系统显示
1 | NAME DESIRED CURRENT READY AGE |
将CKA 备考 - 1 - 建立一个Deloyment并显示状态中建立的Pod的运行实例数扩展到5个, 完成后检查 Deployment 的 Rollout 状态和检查Pod的运行状态。
本题的核心就是考kubernetes的应用伸缩能力。为方便对应用的处理能力进行横向伸缩,kubernetes提供了scale命令,该命令提供了手动对Deployment、ReplicaSet、Replication Controller或 Job 进行横向伸缩的功能。执行后具体的效果就是对应的Pod数量增加或减少(相对于执行scale命令之前)。
本题需要熟练掌握的命令是 kubectl scale, 具体的参数不用记,通过 help 可以现场查看,例如:
1 | kubectl scale --help |
系统将显示
1 | Set a new size for a deployment, replica set, replication controller, or stateful set. |
在本题中,我们使用扩展 deployment 的方法,执行
1 | kubectl scale --replicas=5 deployment/my-dep |
my-dep 是在 CKA 备考 - 1 - 建立一个Deloyment并显示状态 练习中建立的 Deployment。
执行后系统显示
1 | deployment.apps/my-dep scaled |
现在,查看Pod列表系统显示类似如下的信息:
1 | NAME READY STATUS RESTARTS AGE |
可以看到对应的Pod数量已经增加到5个。
再查看rollout状态
1 | kubectl rollout status deployment/my-dep |
或是查看rollout版本
1 | kubectl rollout history deployment/my-dep |
通过观察可以看到,伸缩应用不会影响rollout的状态
]]>使用 nginx:1.16 镜像建立一个名为 nginx-deploy 的 Deployment,本次部署需要三个实例。部署完成后检查 Deployment 的 Rollout 状态和检查POD的运行状态。
该题考的Kubernetes中应用发布的概念机基本命令。 在 Kuberernete 中,与发布应用相关的最基本、最重要的概念是: Deployment 和 ReplicaSet。
Deploymnet 在Kubernetes 中是一个比 Pod 更抽象的管理对象,它解决了 Pod 自身没有自愈能力,不能扩缩容,也不支持方便的升级和回滚的问题。一个 Deployment 对象只能管理一个Pod模板,但可以有多个Pod的副本。
简单来说,Deployment使用ReplicaSet来提供Pod自愈和扩缩容能力。
总结一下: 一个Deployment包含一个ReplicaSet; 一个ReplicaSet包含一个Pod模板, 但可以设定多个Pod的实例。
对资源进行管理, 能够管理的资源包括: deployments 和 daemonsets
提供的子命令包括
a. history - 查看历史版本
b. pause - 暂停资源
c. resume - 恢复暂停资源
d. status - 查看资源状态
e. undo - 回滚版本
平时工作中,处理这样的问题可能更多的会采用编辑yaml文件,然后通过 kubectl apply 命令应用到集群中的方法来处理。但在考试中,对于这样简单的题目,最好自己采用命令的方式。准备考试前,不需要记住命令的所有参数,只需要记住使用那个命令,具体参数的写法可以通过help来查找。比如这道题,使用 kubectl create deployment 命令,执行
1 | kubectl create deployment --help |
可以看到系统显示如下信息
1 | Create a deployment with the specified name. |
实际上这道题需要的命令已经完整的列出来了,稍加改动就i可以直接使用
执行
1 | kubectl rollout --help |
可以看到以下信息
1 | Manage the rollout of a resource. |
1 | kubectl create deployment my-dep --image=nginx:1.16 --replicas=3 |
执行完成后,生成一个名为 my-dep 的 Deployment 对象。能够xi’t显示
1 | deployment.apps/my-dep created |
1 | kubectl get pod |
系统显示
1 | NAME READY STATUS RESTARTS AGE |
刚开始,pod可能会处于ContainerCreating状态, 一般是因为下载nginx镜像需要些时间,下载完就好了。
执行
1 | kubectl rollout status deployment my-dep |
系统显示
1 | deployment "my-dep" successfully rolled out |
从百度网盘或是移动云盘下载镜像
百度网盘下载地址
链接:https://pan.baidu.com/s/1VWqeA1ldpyfJDdNvNCL4xA
提取码:zj2p
移动云盘下载地址
链接: https://caiyun.139.com/m/i?0m5CMSWoSKbbB
提取码:4jfx
下载后解压,是ovf格式的虚拟机镜像,在 vmware 中导入,完成后开机并登录
登录用户为: stu
登录密码为: Password.123
接下来就可以开始配置 ceph 单节点集群环境了。
虚拟机默认采用的是桥接网络,为了便于后续的集群扩展,最好设置为静态IP。
登录到系统中,编辑 /etc/sysconfig/network-scripts/ifcfg-ens160
1 | sudo vi /etc/sysconfig/network-scripts/ifcfg-ens160 |
用你实际环境中的信息替换下面的几项网络设置:
1 | IPADDR="192.168.3.92" |
保存文件后重启网络
1 | sudo service network restart |
我们将集群中的第一台主机的名称设置为: ceph-01, 执行
1 | sudo hostnamectl set-hostname ceph-01 |
修改hosts文件,执行:
1 | sudo vi /etc/hosts |
添加ceph-01到文件中
1 | 192.168.3.92 ceph-01 |
注意: 用你实际环境的IP替换上面的192.168.3.92
用 ansible 安装 ceph 集群时,需要 ansible 的进程需要能够通过无密码的方式ssh到安装机(基本是单机版本也需要完成这个步骤)。
使用ssh-keygen为当前用户(stu)生成ssh key
1 | ssh-keygen -t rsa |
如果提示已经存在,是否覆盖老的文件,选择”y”, 其它全部使用默认设置,完成后,系统将显示类似如下的信息:
1 | Generating public/private rsa key pair. |
将密钥复制到其它节点,包括ceph-01本身(因为在单节点安装中 ceph-01既是部署机也是ceph节点机)。
以复制到 ceph-01 为例,执行
1 | ssh-copy-id ceph-01 |
根据提示输入stu的密码,完成后系统会显示类似如下的信息:
1 | /usr/bin/ssh-copy-id: INFO: Source of key(s) to be installed: "/home/stu/.ssh/id_rsa.pub" |
验证 ssh 能过无密码登录,执行
1 | ssh ceph-01 |
如果能正常登录,得到类似如下的信息:
1 | Last login: Sun Dec 11 03:58:03 2022 from 192.168.3.83 |
注意:验证成功后要执行 exit 命令从 ssh 会话中退出
我在虚拟机里面已经准备了 ceph-ansible 的安装文件和一些为搭建单节点集群的配置文件,你不需要再复制文件或是下载文件到虚拟机中。
ceph-ansible 的安装文件就放在 /home/stu 目录中,文件名为 ceph-ansible-4.0.5.tar.gz
解压该文件在当前目录(/home/stu)
1 | tar -zxvf ceph-ansible-4.0.45.tar.gz |
解压后将目录改名为 ceph-ansible
1 | mv ceph-ansible-4.0.45 ceph-ansible |
这时执行 ls 命令,你应该看到目录中包含以下5个文件和目录
1 | all.yml ceph-ansible ceph-ansible-4.0.45.tar.gz osds.yml site.yml |
接下来,将 site.yml 复制到 ceph-ansible 目录中, all.yml, osds.yml 复制到 ceph-ansible/group_vars 目录中
1 | cp site.yml ceph-ansible |
最后,按实际情况修改这些配置文件
首先,进入 ceph-ansible 目录
1 | cd ceph-ansible |
1 | vi group_vars/all.yml |
对于该文件, 需要修改两项: public_network 和 monitor_interface, 找到并替换为下面的内容
1 | monitor_interface: ens160 |
注意: 用你的实际网络配置替换 192.168.3.0/24
编辑 /etc/ansible/hosts 文件,
1 | sudo vi /etc/ansible/hosts |
添加如下的内容
1 | [mons] |
保存以后,可以运行以下命令进行验证
1 | ansible all -m ping |
如果得到类似如下的信息,则说明配置正确 ansible 能正常运行
1 | ceph-01 | SUCCESS => { |
按照一个ceph-ansible的python依赖库和软件
执行
1 | sudo yum install python-netaddr -y |
按照ceph-ansible项目的依赖, 执行前确保在 ceph-ansible 目录中
1 | pip install -r requirements.txt |
万事俱备,开始部署,执行
1 | ansible-playbook -i /etc/ansible/hosts site.yml |
根据机器性能和网速的不同,这个过程可能要几分钟到二十分钟左右。 如果看到系统显示类似如下的信息则说明按照成功:
1 | ok: [ceph-01 -> ceph-01] => |
部署完成后,也可以在本机(非虚拟机)使用浏览器访问安装好的集群的 Dashboard 界面。在浏览器地址栏输入
1 | https://<你的虚假机IP>:8443 |
在登录界面中输入默认的用户名: admin 和密码: p@ssw0rd (这些其实是在 group_vars/all.yml 文件中设置的),就可以看到Dashboard界面了。如图
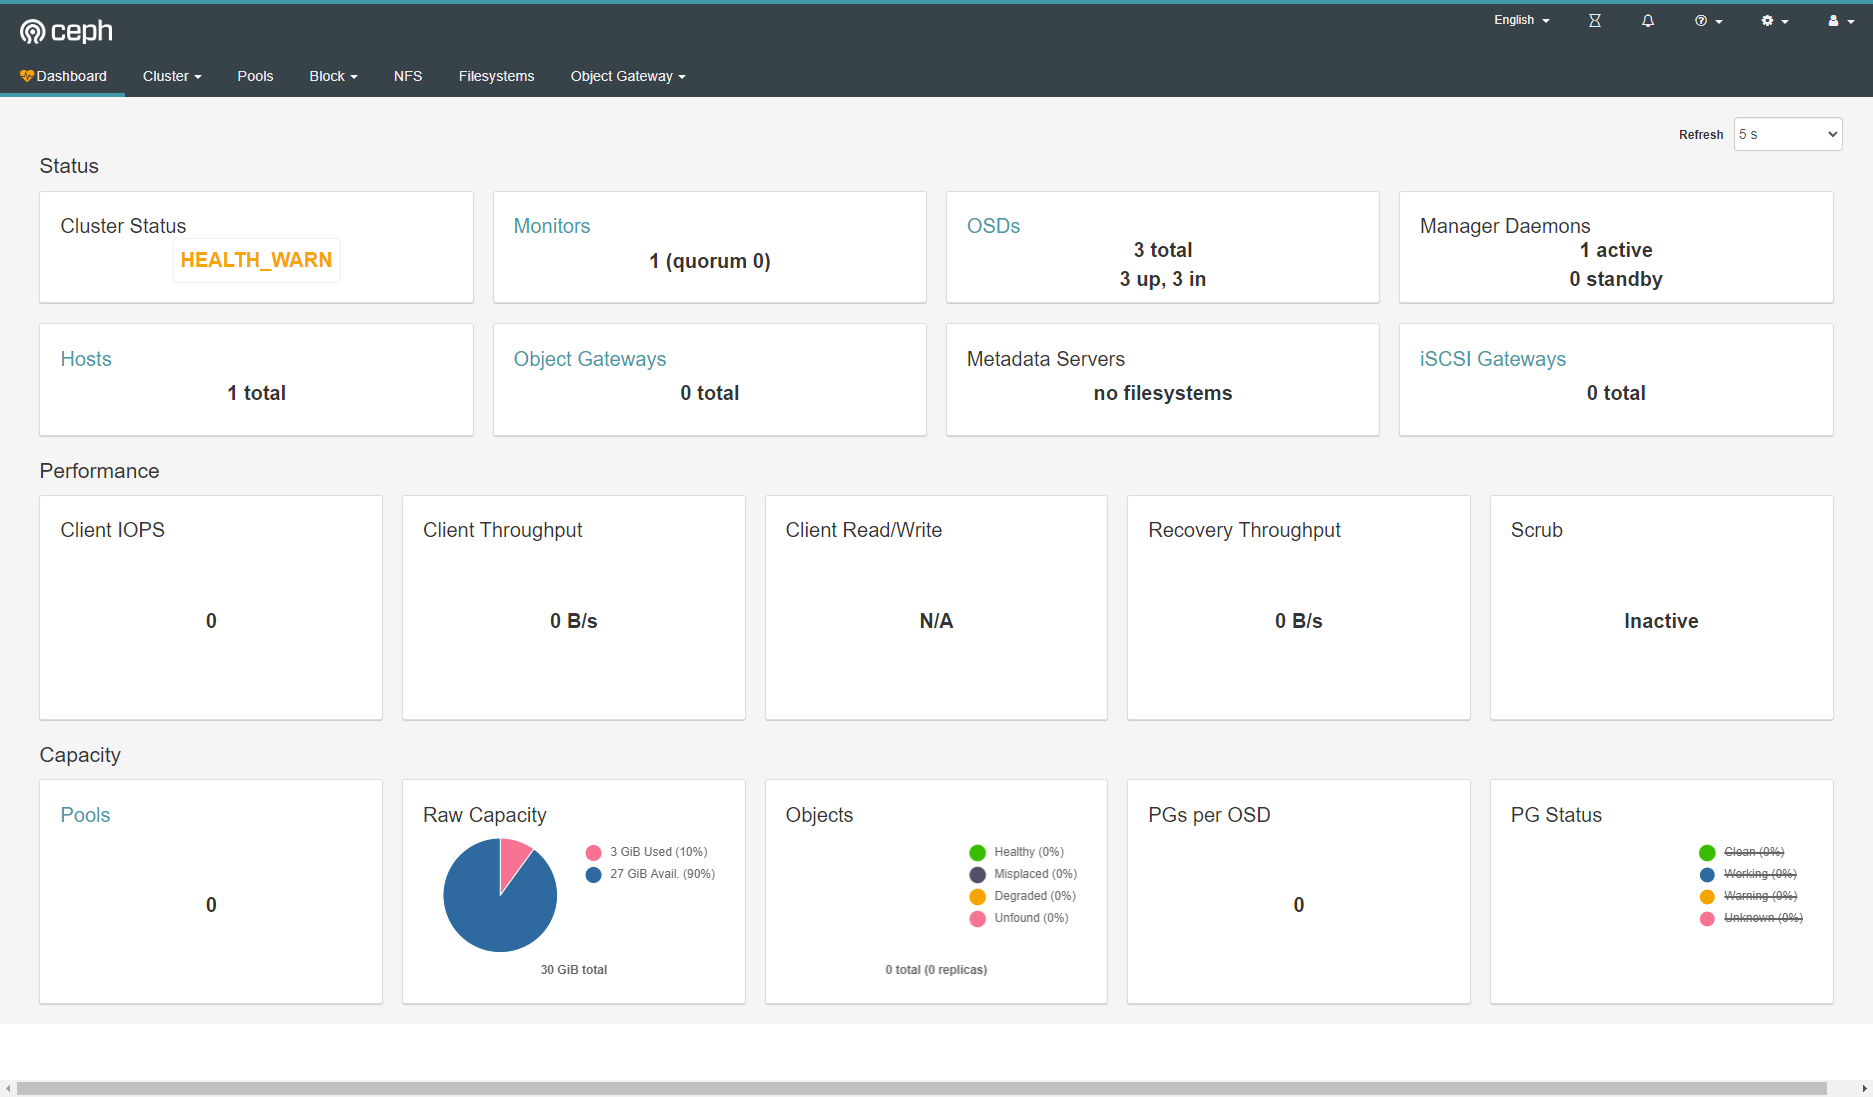
可以看到,集群现在存在一个警告: “mon is allowing insecure global_id reclaim”, 在命令行执行 ceph -s 查看集群的状态时,也可以看到同一个警告。
在命令行执行下面的语句消除该警告
1 | ceph config set mon auth_allow_insecure_global_id_reclaim false |
通过命令建立了一个名为 first_pool 的存储池后,执行 ceph -s 命令可以看到如下的警告:
bash
health: HEALTH_WARN
1 pool(s) have non-power-of-two pg_num
1 |
|
可以观察到 first_pool 的 pg_num 是 10。因此会报上述的警告。 使用 set 命令改变 pg_num 的值
1 | ceph osd pool set first_pool pg_num 32 |
pgp_num 通常设置为与pg_num 相同。
1 | ceph osd pool set first_pool pgp_num 32 |
命令执行后会有一个准备调整的过程,需要一些时间
再查看集群的状态,转为正常
1 | cluster: |
解决方法,修改CRUSHMap。
导出 crushmap, 执行
1 | ceph osd getcrushmap -o crushmap |
反编译
1 | crushtool -d crushmap crushmap.txt |
查看内容,如下:
1 | # begin crush map |
可以看到其中有一条规则, “step chooseleaf firstn 0 type host”,
将 host 修改为 osd
修改为 step chooseleaf firstn 0 type osd
编译
1 | crushtool -c crushmap.txt -o crushmap-new |
加载新规则
1 | ceph osd setcrushmap -i crushmap-new |
再查看集群状态,可以看到 pgs 已经成为 active
1 | cluster: |
问题解决。
]]>准备一台虚拟机(VirutalBox或Vmware),或是在云端申请一台主机
推荐配置如下:
CPU:2核以上,
内存: 4G内存)
硬盘: 除系统盘以外,再配置大小为10G的硬盘三块
安装好CentOS 7 系统并完成以下准备工作:
1 | hostnamectl set-hostname ceph-01 |
1 | 192.168.3.118 ceph-01 |
前面的为你机器的内网地址。
修改 root 用的密码为; Password.123
1 | passwd |
生成key
1 | ssh-keygen -t rsa |
全部使用默认设置,系统显示
1 | Generating public/private rsa key pair. |
将密钥复制到其它节点,以复制到 ceph-01 为例
1 | ssh-copy-id ceph-01 |
验证 ssh 能过无密码登录,执行
1 | ssh ceph-01 |
1 | yum install ansible |
安装完成后可执行 ansible –version 验证安装是否成功。
上传 ceph-ansible-4.0.45.tar.gz 安装包
解压
1 | tar -zxvf ceph-ansible-4.0.45.tar.gz |
改名
1 | mv ceph-ansible-4.0.45 ceph-ansible |
编辑 /etc/ansible/hosts 文件
1 | [mons] |
运行以下命令进行验证
1 | ansible all -m ping |
如果看到类似如下的结果,说明配置成功
1 | ceph-01 | SUCCESS => { |
打开 group_vars/all.yml 文件,修改如下的一些信息
1 | ceph_origin: repository |
查看本机的磁盘
1 | lsblk |
修改 osds.yml 文件
1 | devices: |
复制 site.yml 文件
1 | cp site.yml.sample site.yml |
执行
1 | ansible-playbook -i /etc/ansible/hosts site.yml |
部署完成后,可以执行 ceph -s 查看集群准备,可以看到有一个警告。
执行下面的语句
1 | ceph config set mon auth_allow_insecure_global_id_reclaim false |
以消除警告。
]]>1 | remote: Invalid username or password. |
起因是 Github 已经不支持采用用户名、密码的方式从第三方应用中进行认证。 解决办法使用 “Personal access token”。
登录你的 Github 账号,在右上角头像图标的下拉菜单中选择”Settings”, 再在左边的类别中选择 “Developer settings”。就可以看到 “Personal access tokens”。按”Generate new token”按钮选择生成一个新的token, 选择相关的权限。 用 hexo 进行发布博客,只需要选择”public_repo, repo:status, repo_deployment”这几项权限即可。生成后记得复制github生成的token, 完成后的状态如下图:
完成上述操作后,打开博客项目中的 _config.yml 文件,找到”deploy”配置项,改为如下的格式
1 | deploy: |
用你真实的账号替换“xxxx”, 用上面在github中生成的 token 替换”
保存后再执行 hexo -d 就可以完成发布了。
]]>直接运行 Putty 应用,看到的就是”Putty Configuration”窗口,选择 “Appearance”
再选择 “Font Settings” 中的 “Change…”按钮,选择适合的字体及字体大小并确认(如下图)
完成上述步骤后,再从 Winscp中打开新的Putty时,使用的就是默认设置的字体了。
]]>使用以下命令
1 | kubectl run nginx --image=nginx --restart=Never --port=80 |
然后通过新建一个服务来暴露应用,选择 NodePort 类型,
1 | kubectl expose po nginx --name=front-end-service --port=80 --target-port=80 --type=NodePort |
通常建立这个服务后,就可以通过 localhost 加上 kubernetes 随机生成的端口访问到 nginx 服务了。
但在 minikuber 中使用下面的命令
1 | curl http://locahost:<端口> |
却不能访问,显示连接拒绝。
问题出在 minikube 跑在自己的虚拟网络中,并不是在 localhost 中,因此我们首先需要找到 minikube 的 IP
1 | minikuber ip |
然后通过该 ip 就可以访问了。
1 | curl http://192.168.64.2:<端口> |
比如:执行
1 | kubectl ge node |
系统如下的错误信息
1 | Unable to connect to the server: dial tcp 127.0.0.1:52186: connectex: No connection could be made because the target machine actively refused it. |
一开始有点懵,觉得整个安装步骤都没有报错,说明安装是成功的。仔细想了一下才想起来我原来在这台机器上安装过 minikube , 虽然后来删除了,但可能只是将程序删除了,应该是还残留量一些配置信息,导致了上面的错误。
根据这个思路,查看用户目录中 .kube 目录里面的 config 文件。发现内容如下
1 | apiVersion: v1 |
可以果然是多了一个 Context, 是前一次安装、使用 minikube 时,由 minikube 安装程序建立的 Cluster 和 context 信息, 该 context 的名字被设置为 minikube。
而且配置文件中的 current-context 也被设置为 minikube.
由此推断,简单的删除 minikube 相关的配置信息并修改 current-context 的值就应该可以解决问题。
动手修改 config 文件,最后的内容如下
1 | apiVersion: v1 |
保存后 再执行
1 | kubectl get node |
得到
1 | NAME STATUS ROLES AGE VERSION |
故障解除
]]>因为每个 Docker Desktop 版本对应的 Kubernetes 版本是不同的,所以本文以 4.10.1 版 Docker Desktop 为例
首先下载 4.10.1 版本的 Docker Desktop
如果在官网找不到,我在网盘中共享了一份
链接:https://pan.baidu.com/s/1ja87uL0dg5BIUOS-IaluSQ
提取码:aj4q
下载好以后,双击启动安装程序
在 Configuration 页面记得选择 “Use WSL 2 instead of Hyper-V” 这个选择, 如图:
安装完成后确保 Docker Desktop 能正常启动运行,如图
检查当前 Docker Desktop 所对应的版本, 在 Docker Desktop 界面中选择设置(右上角的齿轮图标),再在左边的列表中选择 “Kubernetes”, 如图
可以看到, 对应的 kubernetes 版本为 v1.24.1
在 Docker Engine 页面加入以下内容,
1 | "registry-mirrors": [ |
如图:
设置好以后,选择 “Apply & Restart”
因为 kubernetes 需要的镜像在国内拉取经常会失败,所以我们选择从国内的镜像仓库(比如阿里)镜像拉取。
Github 上有个项目就是专门用来处理镜像的国内拉取的: k8s-for-docker-desktop/images.properties at master · AliyunContainerService/k8s-for-docker-desktop · GitHub, 本文的镜像拉取部分参考了该网站。
建立一个名为 images.properties 的文件,内容如下
1 | k8s.gcr.io/pause:3.7=registry.cn-hangzhou.aliyuncs.com/google_containers/pause:3.7 |
再在相同目录下建立一个名为: load_images.ps1 的文件,内容如下:
1 | foreach($line in Get-Content .\images.properties) { |
保存以后,在目录开启一个 PowerShell 窗口,执行
1 | .\load_images.ps1 |
拉取完以后,可以使用 docker 命令查看镜像是否都拉取成功,执行
1 | docker images |
正常的话,系统显示
1 | REPOSITORY TAG IMAGE ID CREATED SIZE |
在 Docker Desktop 页面,选择设置 -> Kubernetes -> Enable Kubernetes, 如图:
等一会儿就安装好了,如图:
接下来就可以在命令行窗口使用 kubectl 发送 kubernetes 的相关命令了。
]]>首先,在本机启动已经安装好的 Minikube (如果还没有安装 Minikube, 可以参考在 Apple M1 电脑中安装 minikube进行安装), 执行
1 | minikube start |
如果成功启动,可以看到类似以下的系统输出
1 | 😄 Darwin 12.4 (arm64) 上的 minikube v1.24.0 |
直接在命令行执行
1 | curl -L https://istio.io/downloadIstio | sh - |
也可以直接到 Istio 的 release 页面直接选择对应的版本进行下载, 因为要安装在 Apple M1 电脑上,我们选择 osx-arm64 的这个版本。
下载完成后,进入 isito-1.14.2 目录。因为我们默认的安装目录是 ~\Devel\isito-1.14.2, 所以执行
1 | cd ~\Devel\isito-1.14.2 |
将 ~\Devel\isito-1.14.2\bin 添加到系统 PATH 中去。
如果你使用的是 macOS 默认的 zsh, 则编辑用户目录下的 .zprofile, 加入类似下面的一行
1 | export PATH="$PATH:/Users/xxx/Devel/istio-1.14.2/bin" |
注意:用你的用户名替换上一行中的 xxx
为让修改立即生效,可以执行
1 | source ~/.zprofile |
执行
1 | istioctl x precheck |
**在 MacOS 中第一次执行时,会出现安全提醒,到”系统偏好设置“ -> “安全性与隐私” 中去同意
如果看到类似以下的系统输出,则说明 istio 可以在你的系统中正常安装。
1 | ✔ No issues found when checking the cluster. Istio is safe to install or upgrade! |
执行
1 | istioctl install |
如果看到系统显示类似以下的信息,则表明安装成功
1 | This will install the Istio 1.14.2 default profile with ["Istio core" "Istiod" "Ingress gateways"] components into the cluster. Proceed? (y/N) y |
执行
1 | kubectl get ns |
可以看到系统显示如下信息
1 | NAME STATUS AGE |
其中, istio-system 就是 istio 相关系统组件使用的命名空间
执行
1 | kubectl get pods -n istio-system |
查看 istio-system 中的 pod
1 | NAME READY STATUS RESTARTS AGE |
可以看到, istio 在 minikube 中安装了两个 pod, 分别是 istio-ingressgateway 和 istiod
执行
1 | kubectl get svc -n istio-system |
可以查看对应的服务
1 | NAME TYPE CLUSTER-IP EXTERNAL-IP PORT(S) AGE |
在 Docker官方网站 下载 Docker Desktop, 选择 Mac with Apple Chip 的版本。
下载完成后进行安装,按提示默认安装即可。
下载 minikube 的 arm64 的版本,下载地址
1 | https://storage.googleapis.com/minikube/releases/latest/minikube-darwin-arm64 |
下载完成后的文件就是一个可执行文件,不需要安装。只需要赋予执行权限并放置到 PATH 路径下即可。 执行
1 | chmod +x minikube-darwin-arm64 |
然后
1 | sudo mv minikube-darwin-arm64 /usr/local/bin/minikube |
执行
1 | minikube start --driver=docker |
第一次运行可能会提示该程序(minikube)没有是不安全的程序而阻止运行,这时候需要在 “系统偏好设置” -> “安全与隐私” -> “通用” 中完成同意运行的操作,选择”依然运行”。 然后再次在终端窗口中运行启动的命令。
1 | minikube start --driver="docker" --memory=2048 --image-mirror-country="cn" |
系统输出
1 | 😄 Darwin 12.0.1 (arm64) 上的 minikube v1.24.0 |
执行
1 | minikube status |
系统显示
1 | minikube |
使用 docker images 和 docker ps 命令查看
1 | REPOSITORY TAG IMAGE ID CREATED SIZE |
1 | CONTAINER ID IMAGE COMMAND CREATED STATUS PORTS NAMES |
可以看到,实际上 pull 一个名为 desktop-kubernetes 的进行并运行了对应的容器形成的 minikube 的实例。
]]>In enterprise applications, it is often necessary to add follow-up processing to web requests, or perform some timed tasks, such as: Scheduled cleaning of temporary tables, Scheduled summary of data, etc. Spring Boot provides good support for this type of task, and it is very convenient to develop.
In fact, Spring Boot provides at least two ways to perform scheduled tasks: One is to use @Async annotation, Another is to use @Scheduled annotation.
To define a task that executes asynchronously, all you need to do is to add @Async to the method in the container-managed bean. The most common approach is to define a task as a container-managed bean, annotate it with @Component, and then annotate the method you want to execute with @Async:
1 |
|
Calls can then be made where appropriate, such as in business-layer code, which can be written as:
1 | ... |
Defines a container-managed Bean in which the method is defined as scheduled execution:
1 |
|
1 |
|
The above code is executed every minute.
]]>First, we need add the dependency - DevTools in Spring Boot Application.
1 | <dependency> |
The optional option is to prevent devtools dependencies from being passed to other modules. When a developer packages an app and runs it, devtools is automatically disabled
The runtime option in scope - it set the dependency(package) only works at runtime, not when packaging (prevents the execution of the packaged program online, starts the file listening thread File Watcher, consumes a lot of memory resources)
Settings-compiler-make project automatically
ctrl+shift+alt+/ to activates the Registry dialog box (Mac OS activates the Registry dialog box by double-clicking the shift key)
In the second step of the dialog box, check compiler.automake.allow.when.app.running
As a relatively obsolete technology,By default, the Freemarker is not used as a template for web page rendering in Spring Boot 2, However, in the face of some old system upgrades written in Freemarker, you may also want to be able to configure support for Freemarker.
Next, let’s build a Spring Boot Web Application from scratch and then add support for Freemarker.
In tutorial, we use the following softeware environment, and all softwares are free.
Java: JDK 17 Oracle JDK 17, download it from Offical Website
IDE: IntelliJ IDEA 2021.3.1 Community, download it from Offical Website
In Spring Boot Starter, fill in the basic configuration information(Artifact: todo-restful-service) of the project and the third-party components that need to be used in the project.
In this turorail, we suggest to choose:
And choose the following dependencies:
After completed the above steps, click the “Generate” button to download the generated project basic package. Unizip it and open it with IntelliJ IDEA IDE.
In Spring Boot Web Application, each HTTP request can be configured to respond with a corresponding method in the Controller. In this case, we built a Controller to respond to the root path.
Create a new package named controller and create a new class in the package named IndexController, as follows:
1 |
|
About the more information about spring mvc controller, you can refer the Offical Documentation
In src/main/template folder, create an new file, named: index.ftl. And fill the following content into it:
1 |
|
Rename the application.properties file in src/main/resources: application.yml, and add the following:
1 | spring: |
Run the Web Application
If you run it in console, you can execute:
1 | mvn spring-boot:run |
If you use IDE tools, you can call maven in the IDE menu to run the application.
After the application is running, you can access the following URL via your browse.
1 | http://localhost:8080 |
You can see something like this in your browser
1 | Hello Freemarker! |
You can download the completed code from GitHub
]]>In the IDEA menu, select File -> Settings, and then select in the Settings window that pops up
“Build, Execution, Deployment” -> Compiler -> “Annotation Processors”, then tick “Enable Annotation Processing” on the right, as shown in the following figure:
In the Settings window just now, select Plugins, enter Lombok in “Search plugins in marketplace” to find it, display Lombok and click “Install” to install. As shown in the figure:
Once the installation is complete, follow the prompts to restart IDEA.
]]>